I know I have some jewelry making readers of my blog, and I'm curious. Have any of you used the sterling silver filled wire yet? What do you think of it?
Here are my experiences and I'm curious to know if you are having the same:
1. Harder than sterling silver
2. Tarnishes VERY quickly. I couldn't believe how quickly ear wires that have been sitting on my desk indoors (e.g. climate controlled) have gone from a clean, shiny metal to bronze colored. (like two weeks!)
3. Seem to be wearing as nicely as sterling silver.
How about the rest of you?

Showing posts with label sterling silver. Show all posts
Showing posts with label sterling silver. Show all posts
Friday, August 19, 2011


Tuesday, May 11, 2010
Jewelry making class pictures


This was a large class of seven students. Sometimes they can get a little crazy for me as I try to make sure everyone is being tended to, but this class had some great chemistry and they were really focused! I wish I could play a sound track for this class. They all had to hammer bracelets and it sounded just like what I'm guessing it does in Santa's workshop during the month of December. Lots of dinging and hammering!


These bracelets were done by Rebeccah (below) and Christine (right). They made both of their bracelets from copper. I showed them how to finish their bracelets by applying heat with a torch. They got some beautiful pinks, blues, and touch of gold color on their bracelets.


JoAnn also took the class but managed to sneak away before I could get her bracelet photographed. (Probably was so good she didn't want to put me to shame.)

Wow! It was a great night!! There were several people on the waiting list for this class, so I will be running it again in early July. You can contact Gifts of Avalon now to get on the waiting list.
Monday, March 22, 2010
How to keep your jewelry out of the repair shop
 No one ever buys a piece of jewelry with the intent of destroying it, but sometimes, that's exactly what happens. Unfortunately, I have had to repair jewelry pieces due to neglect or because ladies thought they were actually doing the right thing.
So I realize I don't fix broken-down cars, but a broken or ruined piece of jewelry is kind of like the same feeling (at least to me). You were wanting to wear it only to feel disappointment that not only are you not going to be able to put on that piece of handmade jewelry, but it's going to have to be repaired as well.
This is just a short list of what I usually see and what you can do to avoid mishaps.
1. Stones are ruined after cleaning. I have seen this mostly from people either putting their items into "dip" cleaners or using them in an ultrasonic cleaner machine. Soft and/or porous stones such as pearls, coral, and malachite should be treated with extra care. When in doubt, ALWAYS ask the person you bought your piece of jewelry from.
I only recommend the following cleaning methods:
- A solution of mild soap (such as liquid Ivory) and warm water. Soak the piece for 10 to 15 minutes, rinse. Wipe dry with a soft cloth. This is good for getting grease and fingerprints off a piece.
- Sunshine polishing cloths. These are what I use on my own jewelry. You can very carefully use the cloth to go over pieces while avoiding the stones. I love these things so much I sell them when I do shows.
- Haggerty's silversmith polish sprayed onto a soft cloth. Use these like the Sunshine polishing cloths above. You can usually find this silver cleaning product at some of the large, mass retailers. Don't spray the polish directly onto the piece since it may get into recessions that you won't be able to get it out of.
3. Severe oxidation or tarnishing of a jewelry. This happens when someone doesn't store the piece properly. Mostly, I see this when women take their jewelry off and think "I'll put it away later" only to forget, then find it in a couple of months looking almost black. In a high humidity environment (like Florida) tarnish can happen very quickly! Jewelry can turn dark enough to where the polishing and cleaning methods above don't even work. I do have an industrial grade silver sterling tarnish cleaner that I use in my studio for such cases. It does a better job of removing tarnish than other methods, but isn't completely able to get tarnish out of deep recessions or up next to stones. Read my article here on how to keep your sterling silver jewelry free of tarnish.
These are the biggest ones I see. Are there other problems you have questions about? Let me know below! I'll do my best to get you an answer.
Tuesday, March 16, 2010
Spring is here (at least in Florida anyway)
 I got to spend several hours in my studio yesterday. It was absolutely wonderful feeling humid-free, sunny weather drift through the room. I rely on a lot of natural ventilation and love those few months when I'm not sweating or shivering.
Some of what I did yesterday involved repairing some jewelry, but I also got to finish another class example for the "Learn How to Rivet Metal" class I'm teaching at Gifts of Avalon in April. (Short plug for this store -- if you're into beads, jewelry, glass, do-it-yourself, they are the place to go in Gainesville. Their staff is attentive and they've always got so much to choose from. I love teaching classes there. By the way, they have classes taught by other people as well.)
These two pictures are an example of what c
 lass attendees can expect to make in the class I'm teaching April 12. Believe it or not, you need NO metalsmithing experience to take this class. You will be able to have a pendant like this by the end of the two hour class. I always give class notes for people to take home and I'm available by email for follow up questions.
It's always a good time. I've got a few regular students and it's a small enough class size that I can give everyone the attention they need. If you're interested in taking the class, please contact Gifts of Avalon directly. They handle all the registrations and material fees. If you're interested in being notified of future classes, please sign up for my email list (link at the right side of this blog). I'll be happy to keep you posted on what I'm doing next.
Tuesday, March 09, 2010
A change in the way I do business
 I love making jewelry. It's a great outlet for me. I also love visiting with my collectors. It's how I get to know what everyone likes and doesn't like. It also gives me valuable feedback on what and where to go next with my art. That leads me to a few announcements:
I am moving towards selling more directly from my studio. What does this mean to my typical customer? If you're local, there are a couple of things:
I am going to be selling my jewelry at more home shows and events directly to customers. I really enjoy the relaxed setting of getting to know people. I will not be doing the Santa Fe Community College Spring Arts Festival in Gainesville next month. I will instead, be booking events at homes and businesses. Anyone interested in hosting an event can email me at kmsdesigns@hotmail.com. By selling my jewelry this way, I can offer discounts and incentives to party hosters and attendees. It's a better situation for me because I don't have to be away from my family for extended hours and be concerned with finding childcare.
I will also be reducing the number of Gainesville, Florida area galleries that I show my work in. Effective March 16, my work will no longer be at the Artisans' Guild Gallery. For those of you not familiar with how the gallery operates, the artist members staff and maintain all the business aspects of the gallery. With three small children at home, I cannot honor my 10 to 15 hour monthly commitment to the organization and must resign at this time.
I am excited that I will be able to teach classes monthly at Gifts of Avalon. It is a wonderful opportunity for me to interact with jewelry and crafting enthusiasts on a personal level. My next class is March 29. Details are on the Gifts of Avalon classes page.
 For those of you who are not local to Gainesville, not much should change for you. You will continue to receive top quality jewelry in a timely fashion upon purchase. I have more jewelry to photograph and post, so be looking for new work over the next couple of weeks.
Thank you to everyone for understanding this change. I'm looking forward to offering you more of what you're looking for.
Both pairs of earrings shown are available for $65. Go to the KMS Designs resin and sterling silver earring page to purchase securely through Paypal.
Tuesday, March 02, 2010
Jewelry making classes
For those of you local to Gainesville, Florida who have ever wanted to learn how to make your own jewelry, you're in luck! I'm back to a monthly teaching schedule at Gifts of Avalon. I work with another local jewelry artist to teach basic metal working techniques. I generally teach jewelry making methods that don't require a torch. You would be surprised what you can do with just a few tools.
 My next class is Monday, March 29 from 6 to 8 PM. The class is "How to Make Stamped and Embellished earrings." Attendees will learn how to make earrings (like those shown here) with a few simple tools. No experience is necessary and everyone will have a new pair of earrings in two hours or less! If you're interested in taking the class, please contact Gifts of Avalon. The classes are filled on a first come, first served basis.
If you would like to notified of future classes by email, please sign up for the KMS Designs email list and check the option to join the "class and teaching schedules" list.
Photo credit: Sterling silver french wire stamped earrings with moss agate briollettes
 My next class is Monday, March 29 from 6 to 8 PM. The class is "How to Make Stamped and Embellished earrings." Attendees will learn how to make earrings (like those shown here) with a few simple tools. No experience is necessary and everyone will have a new pair of earrings in two hours or less! If you're interested in taking the class, please contact Gifts of Avalon. The classes are filled on a first come, first served basis.
 If you would like to notified of future classes by email, please sign up for the KMS Designs email list and check the option to join the "class and teaching schedules" list.
Photo credit: Sterling silver french wire stamped earrings with moss agate briollettes
Monday, February 22, 2010
Don't hate it.....just yet anyway
A lot of time, effort and planning go into a piece and/or a line of jewelry. I say that because I think it's hard to people to realize that, as much as I would like to, I can't go "Poof" and produce jewelry. Sometimes I have to plan, design and experiment for years to get the jewelry to a point where I like it AND like to make it. (Case in point, the resin jewelry was a three year process of experiments and prototypes.)
 I tell you this here because sometimes ideas pop into my head and I have to work on them right away. I had an idea of combine acrylic and handmade papers. I had the idea in mind that it would be similar to a line of sterling silver jewelry I did a few years back, but this time it would be with paper. (The point of all this is coming, I promise.) Anyway, I made the prototype and I didn't like it (brown one on the far left). I decided I didn't like the width, so I improved on the next version (pair in the middle). This time, I didn't like the second pair either, but I couldn't decide what I didn't like. Was it the paper, the texture, the size?? I set them aside, thinking they would end up in the prototype file. I really didn't want to hate them, but I certainly didn't like them. (The pair on the end is the finished "likable" pair.)
 I sometimes charge my sub conscious mind with the duty of "fixing a few things" while I'm sleeping, and this design was one of them. I was lucky enough to wake up the next morning with the design improvement I was looking for! I just needed to round the edges a bit. It still gives the same shape, but just "softens" them up a bit. I felt better and love the look. (These are the same two earrings from above, just a closer shot.) At least for me, the earrings don't have that rigid, "geometric" feeling.
This makes me wonder. What else have a thrown in the scrap pile that deserves another look?
The earrings shown here are acrylic with handmade paper adhered to the back. They have sterling silver french ear wires and have a protective coating to make them water resistant. The retail price is $10. Wholesale inquiries are welcome.
 I tell you this here because sometimes ideas pop into my head and I have to work on them right away. I had an idea of combine acrylic and handmade papers. I had the idea in mind that it would be similar to a line of sterling silver jewelry I did a few years back, but this time it would be with paper. (The point of all this is coming, I promise.) Anyway, I made the prototype and I didn't like it (brown one on the far left). I decided I didn't like the width, so I improved on the next version (pair in the middle). This time, I didn't like the second pair either, but I couldn't decide what I didn't like. Was it the paper, the texture, the size?? I set them aside, thinking they would end up in the prototype file. I really didn't want to hate them, but I certainly didn't like them. (The pair on the end is the finished "likable" pair.)
 I sometimes charge my sub conscious mind with the duty of "fixing a few things" while I'm sleeping, and this design was one of them. I was lucky enough to wake up the next morning with the design improvement I was looking for! I just needed to round the edges a bit. It still gives the same shape, but just "softens" them up a bit. I felt better and love the look. (These are the same two earrings from above, just a closer shot.) At least for me, the earrings don't have that rigid, "geometric" feeling.
This makes me wonder. What else have a thrown in the scrap pile that deserves another look?
The earrings shown here are acrylic with handmade paper adhered to the back. They have sterling silver french ear wires and have a protective coating to make them water resistant. The retail price is $10. Wholesale inquiries are welcome.
Sunday, February 14, 2010
Custom order: part 2
 So onto the next pour of the custom order! The picture shows after I poured the orange. I let the resin cure for 36 hours in between pours. That assures me the pour before is solid so that way if I accidentally get resin where it shouldn't be, I can soak it up with a Q-tip, although sometimes accidents happen. See the pendant in the top row just to the right of center? It spilled after I let it cure so I will have some sanding to do later.
 After all the resin has hardended, I can begin sanding. If you look closely at the pieces, you can see I have "overpoured". This is intentional, as I need to sand until the pieces are flush.
 The center pieces of silver are also a little taller than the outer piece to make sure that any spills go to the outside, versus the inside (easier cleanup). The next step in the process is to completely sand it down with 8 different grits of sandpaper. I then use a buff to give it a soft, satin finish. The last step that I do is to coat it with a museum quality microcrystalline wax. That makes the pieces just a smidge on the satin side and makes them moderately tarnish resistant.
 As I was writing this blog post, I realized that I didn't get a picture of the set before my customer picked it up. Whoops! The pendant at left is the same as the one from the first picture in this post (bottom row, middle pendant) and the center pendant in the second picture in this post. This pendant is available for $50 on a 16 inch rubber neoprene cord. Sterling silver chains are an option for an additional charge.
 I hope my customer will send me a picture of his sweetie wearing the set. I will be sure to post. :)
Saturday, February 06, 2010
The custom order process
So the customer I did the mock ups for a couple of weeks ago made a decision as to the color scheme for the resin and sterling silver earring and pendant set. Unfortunately, due to a few factors, it takes me at least a month to get any custom color jewelry made. First, I'm a mom. (That's the full time job!) It's hard for me to get several hours of uninterrupted time in the studio to make the silver pieces, so it takes me longer than perhaps it would other jewelry artists. Secondly, pouring the resin into the sterling isn't as simple as just creating the couple of pieces you need. I have to mix a minimum amount of the resin (for about 20 pieces) in order for it to mix correctly. Therefore, I have to plan several "pours" in advance. It takes me a bit to have all the sterling silver pieces ready and have the game plan mapped out.
So back to the custom pour.....
 I'm pretty excited to get to pair new colors together. My customer picked square earrings with a round center (blue outside, orange inside) and a square pendant with a square center (blue outside and orange inside there too).
You can see his pieces there in the center. Once I mix the resin and add the pigment, I've got about an hour to get it where I want it before it starts to cure.

This is a closeup of the same pieces. The top row, first two pieces, will be the earrings. The bottom row, second piece will be the pendant. You can see some other colors there. They were done a few pours ago and are "waiting" for their partner in subsequent pours.
This particular resin needs about 36 hours to cure. Then I will pour the orange. Stay tuned....
So back to the custom pour.....
 I'm pretty excited to get to pair new colors together. My customer picked square earrings with a round center (blue outside, orange inside) and a square pendant with a square center (blue outside and orange inside there too).
You can see his pieces there in the center. Once I mix the resin and add the pigment, I've got about an hour to get it where I want it before it starts to cure.

This is a closeup of the same pieces. The top row, first two pieces, will be the earrings. The bottom row, second piece will be the pendant. You can see some other colors there. They were done a few pours ago and are "waiting" for their partner in subsequent pours.
This particular resin needs about 36 hours to cure. Then I will pour the orange. Stay tuned....
Saturday, January 23, 2010
Custom orders and mock ups
So it's another over-the-top Saturday night in the studio. Kids are in bed, hubby is at work and I'm working like a crazy woman. I love my family dearly, but I definitely don't have as much time to work on jewelry as I used to. I have to work on my jewelry and the business of making jewelry every possible moment their needs aren't taking priority.
A customer recently contacted me about wanting the University of Florida Gator colors (orange and blue for those of you outside of Gainesville) in a set of jewelry. We talked some details and he actually left it for me to use my judgment. Hmmm.... A couple of days later I had the idea that I would take pieces I've already done and "Photoshop" the Gator colors in there. While my Photoshop skills aren't anything to write home about, I think I did a pretty good job of getting representational images.
I've got a good start below. What do you think? Anyone got any favorites out there? Maybe this is the start of a line of resin jewelry just for University of Florida Gator fans or just someone that loves orange and blue. Are there any other schools with this color scheme? ??
I'll keep you posted on what he likes (it's a gift for his girlfriend). I'll see if I can't get some pictures too as I'm ready to pour and while they're being finished.


A customer recently contacted me about wanting the University of Florida Gator colors (orange and blue for those of you outside of Gainesville) in a set of jewelry. We talked some details and he actually left it for me to use my judgment. Hmmm.... A couple of days later I had the idea that I would take pieces I've already done and "Photoshop" the Gator colors in there. While my Photoshop skills aren't anything to write home about, I think I did a pretty good job of getting representational images.
I've got a good start below. What do you think? Anyone got any favorites out there? Maybe this is the start of a line of resin jewelry just for University of Florida Gator fans or just someone that loves orange and blue. Are there any other schools with this color scheme? ??
I'll keep you posted on what he likes (it's a gift for his girlfriend). I'll see if I can't get some pictures too as I'm ready to pour and while they're being finished.


Sunday, November 22, 2009
New jewelry display pictures

I have jewelry in a local art gallery, the Artisans' Guild Gallery of Gainesville, Florida. The gallery has been in existence since 1965 and is cooperative gallery comprised of approximately 50 local artists. I took in some of my jewelry the other day and was happy with how the display turned out.

I have the jewelry organized by "color," only meaning that the clear resin and sterling silver and resin pieces are intermixed. The picture is a little distant and reflections and such, but the jewelry is actually displayed on brown rice. The texture behind the pieces is an interesting contrast. I like it and so have others who have seen it so far.
Tuesday, November 17, 2009
Where did that day off go?
I kept telling myself last week that if I just got through the Downtown Art Festival, that I could relax for a couple of days and go from there. What was I thinking??? I had completely forgotten that I had a new website to post and get pictures of all the jewelry.
Making the jewelry really isn't bad once I got all the experimenting done. It took about 2 months of playing around with different materials, pigments, mixtures, etc., to find out what worked and what didn't. Today's challenge was actually photographing the jewelry!
I was trying to recreate the display I had at the show this past weekend for my photography. Easier said than done! I'm not a photographer by any stretch and certainly found it difficult to capture the jewelry on camera as it looks in person. Once again, Karma came to help. Normally I don't mind the company, but in this case, she thought it would be more fun to play with the pendants rather than letting me photograph them. As I scolded her, she advised me of her displeasure. I suppose we will have to make up later. :)
The true unfortunate part in all this is that I found out my camera needs to be repaired as it is picturing everything with a blue tint. I suppose I could correct most of it with Photoshop, but I really prefer to minimally correct items with a computer. I feel like it's cheating or something. So that means that pieces will take a little longer to get on the site.
As for the site itself, it's mostly up, but there is a big glitch in that it won't load correctly in Firefox. I've got a request in to technical support, so I hope to have it resolved in a day or two. Until then, no day off. Hopefully this weekend....maybe......
Making the jewelry really isn't bad once I got all the experimenting done. It took about 2 months of playing around with different materials, pigments, mixtures, etc., to find out what worked and what didn't. Today's challenge was actually photographing the jewelry!
I was trying to recreate the display
 I had at the show this past weekend for my photography. Easier said than done! I'm not a photographer by any stretch and certainly found it difficult to capture the jewelry on camera as it looks in person. Once again, Karma came to help. Normally I don't mind the company, but in this case, she thought it would be more fun to play with the pendants rather than letting me photograph them. As I scolded her, she advised me of her displeasure. I suppose we will have to make up later. :)
The true unfortunate part in all this is that I found out my camera needs to be repaired as it is picturing everything with a blue tint. I suppose I could correct most of it with Photoshop, but I really prefer to minimally correct items with a computer. I feel like it's cheating or something. So that means that pieces will take a little longer to get on the site.
As for the site itself, it's mostly up, but there is a big glitch in that it won't load correctly in Firefox. I've got a request in to technical support, so I hope to have it resolved in a day or two. Until then, no day off. Hopefully this weekend....maybe......
Monday, November 02, 2009
Pouring resin
Just a few pictures to share with you as I pour resin into some of the sterling silver pieces.
You will have to use some imagination here too (hubby isn't the best photographer). :)
First, I have already formed and constructed the sterling silver pieces. That is a entire job onto itself.
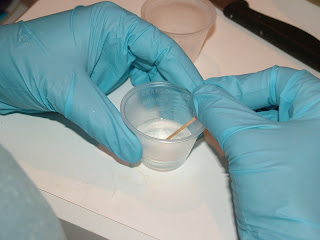 Left: I'm mixing the resin. This pour happens to start with "crystal clear". It's a small amount and the measuring must be exact for it to cure properly.
 Left: I'm adding the color pigments. I want just a "touch of pink" for this pour.
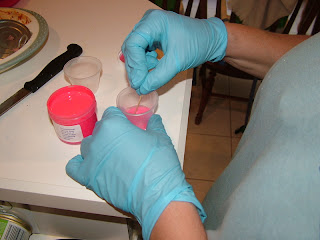 Left: I must stir again thoroughly to make sure the color gets mixed evenly.

Left: These are pieces that have been "set up" and are ready to receive the resin.

Left: I'm using a small syringe to place the resin EXACTLY where it needs to be.
The pieces need approximately 36 hours to cure. After that, they are all sanded by hand on both sides to get a nice neat and even appearance.
You will have to use some imagination here too (hubby isn't the best photographer). :)
First, I have already formed and constructed the sterling silver pieces. That is a entire job onto itself.
 Left: I'm mixing the resin. This pour happens to start with "crystal clear". It's a small amount and the measuring must be exact for it to cure properly.
 Left: I'm adding the color pigments. I want just a "touch of pink" for this pour.
 Left: I must stir again thoroughly to make sure the color gets mixed evenly.
Left: These are pieces that have been "set up" and are ready to receive the resin.

Left: I'm using a small syringe to place the resin EXACTLY where it needs to be.
The pieces need approximately 36 hours to cure. After that, they are all sanded by hand on both sides to get a nice neat and even appearance.
Monday, September 28, 2009
Thornebrook Festival this weekend
I will be at the Thornebrook Fine Art Festival in Thornebrook Village this coming weekend. All my work will be on sale to make room for my new line of jewelry. I will be in the green zone, booth 15 (the same spot I have always been in). For anyone who is interested in my jewelry, but can't make it this weekend, I will be happy to offer you sale prices and take your order over the phone. Email (kmsdesigns@hotmail.com) or call (352-335-4859) with your request and I will do my best to accommodate your needs.
Wednesday, October 01, 2008
Hammered earrings with stones
 Hammered sterling silver earrings on french wires. Assorted semi-precious stones available. Earrings hang 1 1/2 inches long by 3/4 inches wide., each disc 1/2 inch in diameter.
Far left picture (top, moving clockwise): black star diopside; red coral, green aventurine, rhodolite garnet
$50, limited edition
Sunday, September 28, 2008
Metal earrings
 Hammered metal earrings on french wires, 1 1/4 inches in diameter.
 Top: sterling silver; $30
Lower Left: 14K gold fill; $40
Lower right: Copper; $18
Sunday, June 08, 2008
Turquoise and jasper pendant
.JPG)
Kingman turquoise (from Kingman, Arizona) and poppy jasper (from Morgan Hill, California) bezel set in sterling silver. Pendant measures 2 inches long by 5/8 inches wide
$150
one of a kind
$150
one of a kind
This is my most unusual color combination of poppy jasper. I have never had another piece with beige colored orbs on a red background
Tuesday, May 20, 2008
Mookaite jasper earrings
.JPG)
Mookaite jasper (from Australia) bezel set in sterling silver. Post earrings measure 1 1/4 inches long by 5/8 inches wide
$90
one of a kind
I was amazed at the colors and pattern of this matched pair. The mauve color is quite rare, as mookaite generally has more of a red color.
Sunday, May 18, 2008
Tube onyx pendant

Tube onyx bezel set in sterling silver. Pendant measures 1 1/2 inches wide by 1 inch long
$200
one of a kind
$200
one of a kind
Tube onyx has so many great patterns, but this is my most favorite. This piece has managed to capture everything I love about tube onyx.
Saturday, May 17, 2008
Sodalite earrings
.JPG)
Sodalite bezel set in sterling silver hinged on patterned sterling silver post earrings. Measure 1 3/8 inches long by 1/2 inch wide
$100
one of a kind
$100
one of a kind
The pattern in these is just fascinating and even more spectacular in a matched set.
Subscribe to:
Posts (Atom)
