Tuesday, May 04, 2010

Death by chocolate

Share |
Sounds like a good way to go doesn't it? Actually, it's one of my favorite EASY dessert recipes. It works great for serving a large group of people and looks beautiful if you can assemble it in a large glass serving bowl. It has gotten rave reviews and it is so simple I almost feel guilty for letting people think I'm a gourmet cook. (notice I said almost)

Death by chocolate

1 boxed brownie mix (I prefer Ghirardelli)
2 packages of chocolate mousse mix
16 ounces of cool whip, thawed
4 to 6 Heath bars
1 thick chocolate bar (optional)

Make the brownies according to package directions. If you're a Kahlua fan, you can poke holes in the brownies after they come out of the oven and drizzle with the Kahlua. I have done it both ways and found it to fine either way. Once the brownies are cool, crumble into large pieces. Make the chocolate mousse according to the package directions. (You can do this while the brownies are cooking and keep the mousse in the refrigerator when finished.) Layer half the brownies, half the chocolate mouse mix, and half the cool whip. Crumble the Heath bars (use 4 to 6 based upon your toffee preferences). Sprinkle half of this on top. Repeat the layers. Shave chocolate on top of the mix as a pretty garnish, but this is optional. Store in the refrigerator until ready to serve.

That's it! I would suggest making it no more than 8 hours before you need it. It lasts at least two more days in the refrigerator after making. This can serve 8 to 12 people easy. This recipe easily fixes my chocolate dessert cravings!

Monday, May 03, 2010

Tips for using resin to make jewelry

Share |
I've had a few followers email me with questions about my experiences with using resin in jewelry making. I thought I would share a few tips and what I've learned from my mistakes with readers.

Picture credit: "Pink and green epoxy resin, sterling silver french wire earrings"


  1. Everything you are using must be completely dry. If you're using a setting that you have made yourself, make sure it is "bone dry" before putting the resin in it. Resin does not like additional moisture and even the slightest amount of water in the corners of your piece may keep the resin from setting properly. If my sterling silver setting has just come out of the pickle pot, I will put a heat gun on it for a few seconds to evaporate any water before pouring.
  2. Follow the mixing directions exactly. This may seem like "duh", but I'm also the type that just kind of shakes off the excess flour in the measuring cup when I'm making a recipe. In order for it to cure properly, things must be exact. (And by the way, every resin is different in it's mixing instructions. I always reread the directions every time I mix a resin.)
  3. Measure the resin and catalyst in two separate cups before mixing. I know cups get expensive, but that way if you overpour one, you can put some back without messing up your ratios.
  4. Have everything ready to go before you mix and pour. Resins have what's called a "pot" time. This is the amount of time that the resin is fluid and you can work with it. The polyester resin I use has about an 8 minute pot time. I don't have any time to waste! I have my molds and inclusions (usually glass pieces) ready to go so that my resin doesn't set up in the mixing cup before it gets poured.
  5. If something goes wrong, call technical support of the company that made it. They know a lot about their product! I have done this for a couple of the resins I work with. Sometimes it was my fault, sometimes it was the Florida humidity. I would also suggest being "boy scout honest" with these people. If you're using a pigments and inclusions, let them know. They certainly can't give you the best pointers without knowing all the information.
  6. Plan on experimenting, then abusing the pieces before selling. I will experiment with different pigments, colors, inks, inclusions, found objects, etc., then let the "elements" take over. I leave them in the sun, close to heat, etc. I want to know that even though the piece looks good when it pops out of the mold, I want to make sure it doesn't get icky later. (Remember that resin doesn't like water? Some of the pigments I put it can attract water. I want to make sure the piece doesn't go haywire in a couple of weeks or so.)
Those are my basic tips. I know there are some discussion boards out there too with people's comments. Happy jewelry making!

Picture credit: "Gotcha candy heart, epoxy resin pendant"

Monday, April 26, 2010

5 biggest blunders men make when buying jewelry for a gift

Share |
I love it when guys are buying jewelry for their ladies. It's such a sweet and thoughtful notion on their part. I LOVE to help them! Unfortunately, it doesn't always turn out well, so I wanted to share the top five mistakes guys make buying jewelry:

1. Not knowing the details. I have actually had men buy earrings for a gift and not know if the woman had pierced ears. Wow! Major gamble! Find out as much information about your lady as possible. A good start is to find out a ring size, bracelet size, preferred length of necklaces, color preferences, metal preferences and any allergies.

2. Getting her something she doesn't have. This is only a good thing if you have heard her say that she wants a ".....". For example, if she doesn't own any bracelets, there may be a good reason why. Maybe she has a job where it gets in the way or she would have to take it off frequently. Take a quick inventory of her jewelry and get an idea of what she prefers or take notes the next time you are window shopping together.

3. Not considering the "what ifs". Is your jewelry purchase sizable? Can you return or exchange it if she doesn't like it? What if she likes the pendant but wants a different chain? Understand the exchange and return policy on the jewelry BEFORE you purchase it.

4. Buying something that doesn't go with her body type. Believe it or not, how a piece of jewelry is shaped or formed impacts how it looks on a person. For example, round earrings do not look good on a woman with a round face. A small pendant on a short chain isn't particularly flattering to a curvaceous woman with a large bustline. When you're buying the piece, get the person helping you to give suggestions or even the model the jewelry if necessary to help with the decision making process.

5. Buying something that doesn't go with her style. Buy her something she will wear! If she doesn't go to a lot of fancy occasions, she may not get a lot of wear from a big, fancy cocktail ring. Inexpensive earrings may be a better fit for daily wear. If she does a lot of work with her hands, a ring may not hold up to her rough schedule, but a necklace might fit the bill

Mother's Day is coming up and I am happy to help the guys out there get a special gift for the moms in their lives. Contact me at the KMS Designs jewelry website for help getting your special gift.

Wednesday, April 21, 2010

Make your own forged bracelet

Share |
I'm teaching a completely new class next month at Gifts of Avalon. In this class, I will show you how to forge a cuff bracelet from your choice of metal. Learn how to make the bracelets shown here. They will post information about upcoming classes in their next newsletter, but you can go ahead and call them directly at 352.379.1272 to sign up.


The top bracelet is made from copper. The bottom bracelet is made from brass. The copper bracelet has been finished to have a "multi color" look, whereas the brass bracelet does not have the patina.


Even if you have no metalsmithing experience, you will be able to make this bracelet.


A model shot! The funny part in this is that I was the model. Hard to hold the camera and extend my arm at the same time, but you get the idea.

Monday, April 19, 2010

Experimenting with new materials

Share |
I realize this looks like a jumbled up mess. (It really makes more sense when I'm sitting in front of it.) I had the chance yesterday to play with some new designs for acrylic jewelry. I worked with some handmade papers, colored pigments and clear acrylic sheet. All in all, I'm not sure I got a "winner" out of it, but I think I have a great idea to teach a handmade jewelry project to a class.


I'm a bit anal about what I sell to customers. I want to be sure that it is something unique, wearable and durable. The pigmented powders on the acrylic jewelry were neat looking, but I don't know how well they hold up after months to years of wear. The acrylic pendants I made will end up on the "let me think about it" table. As I have found out in the past, they sometimes can come back to be winners. :)

In the meantime, I will get the acrylic jewelry making class project idea together and will share with all once it's finished.

Friday, April 16, 2010

Is your jewelry protected?

Share |
With spring cleaning on everyone's mind, cleaning out a jewelry box might fall somewhere on your list. Did you know that many homeowner's insurance policies will not cover the full value of your jewelry if it's lost or stolen? I recently found an article, Appraising Fine Jewelry. It covers the basic details of what you should have appraised, who you should get to do it, and what you can expect it to cost.

Thursday, April 15, 2010

So what do I read?

Share |
Jewelry books of course! I do read other books as well, mostly mystery/thriller type books, but I LOVE jewelry books. Any and all of them, whatever the topic. I love reading about different artists' techniques and inspirations. My latest book I am pouring through is 500 plastic jewelry designs. I would dare say it's a "coffee table" book. The picture on the cover says it all; it's creations from artists well known in their fields, no instructions, just gallery shots. I love looking at other people's work, not to copy, but to find inspiration. I love looking at color schemes, and wonder "how did they do that?" I've been through this book about a dozen times now and haven't gotten bored yet. And the glass of wine? That didn't come with the book, but certainly a prerequisite on my end. I love a good red wine!

Wednesday, April 14, 2010

More plants and herbs

Share |
I got motivated the other day after planting the basil to get a few more things planted on my patio as well. At left is my tomato plant. He will only make little cherry tomatoes, but I thought they would go good with the basil. Now I only need a buffalo to make the milk for the fresh mozzarella and I could have caprese, but somehow I don't think my neighbors would like the noise. *grin*


I also got a oregano plant in a planter too. I love how this herb smells! If I find some good recipes, I will be sure to share.

Tuesday, April 13, 2010

Class projects: riveted metal

Share |
I had the opportunity to teach another class last night at Gifts of Avalon. I thought it would be fun to share everyone's finished projects!

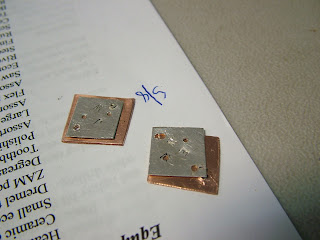
Last night's class was joining metal with rivets. Basically, you use metal rivets or metal tube to join pieces of metal together (much like the rivets on jeans). This piece is from Linda. She used brass rivets to join copper to sterling silver sheet. She stamped initials on the left side of her pendant. Linda had a surprise visit from her boyfriend who I think was impressed with her new skills.


These earrings are from Chris. She has taken several of my classes and I always enjoy hearing about her family. She stamped her children's initials on the top sterling piece and will rivet the sterling silver to copper underneath. She used sterling silver tube for her rivets.


Carol is my "overachiever" (*wink*). Her project was creating a sterling silver cutout of a heart to rivet on top of copper. Her pendant will also have tube rivets at 12 o'clock and 6 o'clock. I love that she always aims high in her projects.


(Another) Carol in the class made hammered copper earrings. They have sterling silver squares riveted to the top with brass rivets. Her earrings have a nice, shiny finish. This Carol was a complete newbie and made these earrings in about 2 hours!


I love teaching students! They force me to think in new ways. It's a good night for me as well.

Tuesday, April 06, 2010

Spending more time in the kitchen

Share |
I realize how strange the title of this blog post sounds. Who wants to spend more time in the kitchen? Actually, I do. I used to do a lot more cooking before my kids were born, but since then, it's a "How fast can I throw something together?" routine. My aunt gave me a subscription to Food Network magazine and I must say that I love it! (The latest issue is in the picture. It's a grilled cheese sandwich with ham, cheese, grilled onions and apple. Yum!) I can't gush enough about their recipes. I would say they are moderate on the complexity, but I love all the new ways to try the "same old foods". I have enjoyed almost every recipe I've made from the magazine and so has my hubby (who doesn't tend to like the "froo-froo" kind of cuisine. *grin* Does anyone have other food and recipe magazines you like?

So along that line, I started my herb garden in pots yesterday. I've only got the basil planted, but the oregano, cilantro, rosemary, and dill are coming. Any other suggestions for herbs? Maybe some mint or tarragon?

Friday, April 02, 2010

Why didn't I think of that?

Share |
So I mentioned on the KMS Designs Facebook fan page a few days ago that I didn't like the pictures I had taken of my jewelry. Helen, one of my fans and newest friends, gave a suggestion on a setup to try. Once she mentioned it, I thought, why didn't I think of that?? I did some research on the setup she shared and had then idea to make my own. I took a styrofoam cooler and cut it to work for my tripod and camera. I like the resulting pictures much better! Thanks Helen!

Thursday, April 01, 2010

Teaching jewelry making classes

Share |
I love teaching jewelry classes. It's a great chance for me to meet new people and "get back to basics." I mostly teach classes that don't use a torch (yes, there is a lot of fun stuff you can do without a torch). One of the things I like about teaching is that students look at things with a fresh set of eyes (or "virgin" eyes for the newbies). I will get questions about why you do something a particular way, or why can't you do something a particular way. It actually makes me wonder, "well, why can't we do it this way??" Their perspective is great and I enjoy the listen and learning opportunity.

My class was almost done the other night before I remembered to take pictures. I teach at Gifts of Avalon, which is a bead and metalsmithing shop here in Gainesville. I've known Trude and Rhonda (the shop owners) a long time and they have a great place for anyone crafty! Their staff is helpful and even if you have never done any beading or metal work before, you'll have a new piece of jewelry to wear in no time.


One of the nice things about teaching at Gifts of Avalon is that their student teaching area has ample space. We're not bumping elbows and it's actually a separate part of the store, so we can hammer metal and not disturb the rest of the people in the store. They also have a lot of the jewelry making equipment so I can teach people on the equipment they can buy there in the store to take home and use. I also make myself available to students by email for followup questions and such. (I know I'm guilty of trying to read notes later and thinking, "Now what did she say again???")

Meet Suzanne. She has been one of my jewelry customers for a long time (she's wearing a pair of my earrings -- *smile*) She made a very nice pair that evening that she finished at home with some beads. (I can't wait to see how they turned out.) She also helped me to realize that my house would be cleaner if I didn't spend so much time making jewelry. (big laugh!) Eh, a few dust bunnies never killed anyone.

If you're interested hearing about upcoming classes I'm teaching, you can sign up for my mailing list (right column of this blog) and select the "class and teaching schedule" list.

Tuesday, March 30, 2010

Azaleas in bloom

Share |
I love blooming azaleas. They're in full swing in my front yard right now and I wanted to share some pictures. I put fertilizer on them twice year and prune them back, but that's it. I have actually decided that I do less harm to plants in general if I just leave them alone.

Now if I could only capture this color pink in some resin!


Monday, March 29, 2010

It's prom season!

Share |
Yes, I'm a little too old to go the prom, but I came across a neat article from the Denver post the other day Prom Fashion: The long and short of Spring Formals. Neat article, mostly because I love that when you're young, you can wear whatever you want without judgment! (Case in point, the prom dress example shown here which is mentioned in the article.)

When I'm talking to people about my jewelry, I hear ladies talk about how they find some of my contemporary jewelry a little "too much" for them to wear. My advice? Go with colors you are comfortable with. If you're used to wearing blue, why not go with blue in a different setting? I'm from the school that believes less is more, especially when it comes to fashion and jewelry. Most of the fashion experts will tell you not to load up on every trend for a season. Pick a few that you like and feel comfortable with. You will wear them better because you are comfortable with them.

Contemporary art jewelry can be worm the same way! Pick a piece your two that you like (size, shape, color, etc.) and start with one piece (earrings, a pendant, one bracelet). Wear it a few times, then go from there on what to add next to your collection.

Thursday, March 25, 2010

Starting a new tradition

Share |
I get lots of nice comments from people that I meet at art shows, jewelry making classes, and such saying they feel like I'm "one of the family." I think these are some the nicest things anyone could say to me. I always try to treat people with respect and kindness and I'm glad to know that it shows. This got me thinking, why not make them a part of my family too? I thought that I would share, from time to time, some of my family's favorite recipes. My mother was a home economics teacher, so cooking and learning how to cook has been a part of my life ever since I can remember.

This recipe comes from a friend of mine in college. I thought this would be great to share since the Easter and Passover holidays just beg for brunches. This breakfast dish is wonderful to feed a crowd and since you make it the night before, it's the perfect "force me to be organized" breakfast dish.

Breakfast Casserole

1 1/2 boxes of Pepperidge Farm croutons or 8 slices of bread, cubed
3 cups of milk
4 eggs
1/4 tsp dry mustard
1 can cream of mushroom or cream of broccoli soup
2 to 3 cups of cheddar cheese (more or less to your liking)
1 pound of ground sausage
Package of ritz or saltine crackers
2 tablespoons of butter, melted

Spread bread/croutons in the bottom of a 9 x 13 inch pan. Mix 2 1/2 cups of the milk, eggs, and mustard. Pour over the croutons. Brown the sausage. Sprinkle the meat over the crouton mixture. Top with the cheese. Refrigerate overnight.

In the morning, mix the remaining 1/2 cup of milk with the soup. Pour over the casserole. Bake at 350 degrees for 1 hour. Crush a sleeve of crackers. Mix the crackers with the melted butter. Pour over the casserole for the last 5 to 10 minutes of baking.

Enjoy!

Wednesday, March 24, 2010

Photographing Jewelry

Share |
It is a beautiful day in Florida. Lots of bright sun and clear skies. This is the perfect day for me to take jewelry pictures outside. I love the natural light for taking pictures. It captures the colors the best and I only have to crop the pictures once I take them (versus using a photoeditor to adjust brightness, contrast and such).

I find a nice place to set up outside to get a good photograph. I always try to take pictures as close to 12 noon as possible in order to minimize shadows. My setup is a Fuji FinePix S7000 camera attached to a Benbo mini-trekker tripod. My backgrounds vary, depending on what I'm photographing. Today, I used a piece of ceramic tile.


So apparently, no jewelry work would be complete without help from my cat Karma. I hadn't seen her for hours and wouldn't you know it, here she comes to help.

So the ironic part in all this? I didn't like how they looked on the white tile. It was too much contrast between the tile and the jewelry. I dug out a piece of stained plywood I had and took pictures of the same jewelry on it instead.

Today's pictures were of my new acrylic and sterling silver jewelry line on the KMS Designs website. The pictures from today can also be seen on the KMS Designs Flickr page.

Monday, March 22, 2010

How to keep your jewelry out of the repair shop

Share |
No one ever buys a piece of jewelry with the intent of destroying it, but sometimes, that's exactly what happens. Unfortunately, I have had to repair jewelry pieces due to neglect or because ladies thought they were actually doing the right thing.

So I realize I don't fix broken-down cars, but a broken or ruined piece of jewelry is kind of like the same feeling (at least to me). You were wanting to wear it only to feel disappointment that not only are you not going to be able to put on that piece of handmade jewelry, but it's going to have to be repaired as well.

This is just a short list of what I usually see and what you can do to avoid mishaps.


1. Stones are ruined after cleaning. I have seen this mostly from people either putting their items into "dip" cleaners or using them in an ultrasonic cleaner machine. Soft and/or porous stones such as pearls, coral, and malachite should be treated with extra care. When in doubt, ALWAYS ask the person you bought your piece of jewelry from.

I only recommend the following cleaning methods:
  • A solution of mild soap (such as liquid Ivory) and warm water. Soak the piece for 10 to 15 minutes, rinse. Wipe dry with a soft cloth. This is good for getting grease and fingerprints off a piece.
  • Sunshine polishing cloths. These are what I use on my own jewelry. You can very carefully use the cloth to go over pieces while avoiding the stones. I love these things so much I sell them when I do shows.
  • Haggerty's silversmith polish sprayed onto a soft cloth. Use these like the Sunshine polishing cloths above. You can usually find this silver cleaning product at some of the large, mass retailers. Don't spray the polish directly onto the piece since it may get into recessions that you won't be able to get it out of.
2. Holes or "pitting" of the metal. I usually see this after someone wears the jewelry while exposing the jewelry to bleach. Most everyone thinks to take their jewelry off before using household cleaners, but some women forget about wearing their jewelry in pools and spas. Chlorine is used to keep those things sanitary. It's that same chlorine in the bleach that pits the metal. Unfortunately, there is no fix for this.

3. Severe oxidation or tarnishing of a jewelry. This happens when someone doesn't store the piece properly. Mostly, I see this when women take their jewelry off and think "I'll put it away later" only to forget, then find it in a couple of months looking almost black. In a high humidity environment (like Florida) tarnish can happen very quickly! Jewelry can turn dark enough to where the polishing and cleaning methods above don't even work. I do have an industrial grade silver sterling tarnish cleaner that I use in my studio for such cases. It does a better job of removing tarnish than other methods, but isn't completely able to get tarnish out of deep recessions or up next to stones. Read my article here on how to keep your sterling silver jewelry free of tarnish.

These are the biggest ones I see. Are there other problems you have questions about? Let me know below! I'll do my best to get you an answer.

Tuesday, March 16, 2010

Spring is here (at least in Florida anyway)

Share |
I got to spend several hours in my studio yesterday. It was absolutely wonderful feeling humid-free, sunny weather drift through the room. I rely on a lot of natural ventilation and love those few months when I'm not sweating or shivering.

Some of what I did yesterday involved repairing some jewelry, but I also got to finish another class example for the "Learn How to Rivet Metal" class I'm teaching at Gifts of Avalon in April. (Short plug for this store -- if you're into beads, jewelry, glass, do-it-yourself, they are the place to go in Gainesville. Their staff is attentive and they've always got so much to choose from. I love teaching classes there. By the way, they have classes taught by other people as well.)

These two pictures are an example of what class attendees can expect to make in the class I'm teaching April 12. Believe it or not, you need NO metalsmithing experience to take this class. You will be able to have a pendant like this by the end of the two hour class. I always give class notes for people to take home and I'm available by email for follow up questions.

It's always a good time. I've got a few regular students and it's a small enough class size that I can give everyone the attention they need. If you're interested in taking the class, please contact Gifts of Avalon directly. They handle all the registrations and material fees. If you're interested in being notified of future classes, please sign up for my email list (link at the right side of this blog). I'll be happy to keep you posted on what I'm doing next.

Tuesday, March 09, 2010

A change in the way I do business

Share |
I love making jewelry. It's a great outlet for me. I also love visiting with my collectors. It's how I get to know what everyone likes and doesn't like. It also gives me valuable feedback on what and where to go next with my art. That leads me to a few announcements:

I am moving towards selling more directly from my studio. What does this mean to my typical customer? If you're local, there are a couple of things:

I am going to be selling my jewelry at more home shows and events directly to customers. I really enjoy the relaxed setting of getting to know people. I will not be doing the Santa Fe Community College Spring Arts Festival in Gainesville next month. I will instead, be booking events at homes and businesses. Anyone interested in hosting an event can email me at kmsdesigns@hotmail.com. By selling my jewelry this way, I can offer discounts and incentives to party hosters and attendees. It's a better situation for me because I don't have to be away from my family for extended hours and be concerned with finding childcare.

I will also be reducing the number of Gainesville, Florida area galleries that I show my work in. Effective March 16, my work will no longer be at the Artisans' Guild Gallery. For those of you not familiar with how the gallery operates, the artist members staff and maintain all the business aspects of the gallery. With three small children at home, I cannot honor my 10 to 15 hour monthly commitment to the organization and must resign at this time.

I am excited that I will be able to teach classes monthly at Gifts of Avalon. It is a wonderful opportunity for me to interact with jewelry and crafting enthusiasts on a personal level. My next class is March 29. Details are on the Gifts of Avalon classes page.

For those of you who are not local to Gainesville, not much should change for you. You will continue to receive top quality jewelry in a timely fashion upon purchase. I have more jewelry to photograph and post, so be looking for new work over the next couple of weeks.

Thank you to everyone for understanding this change. I'm looking forward to offering you more of what you're looking for.

Both pairs of earrings shown are available for $65. Go to the KMS Designs resin and sterling silver earring page to purchase securely through Paypal.

Thursday, March 04, 2010

My orange tree post cold weather

Share |
It's spring here and we've been enjoying oranges off the tree for about a week or so. Since it was a rough winter on the tree (I blogged about this in January), I thought I would let everyone know the tree survived, albeit barely.


The oranges were able to finish ripening, but the tree looks rough. About half the leaves fell off and if you look at the picture above closely, the branches that extend up (from about 10 o'clock to 2 o'clock) are completely bare. These are the ones that were shoved into the top of the tent and apparently got too cold anyway.

I'm grateful he pulled through and hoping a springtime recovery is coming soon.

Tuesday, March 02, 2010

Jewelry making classes

Share |
For those of you local to Gainesville, Florida who have ever wanted to learn how to make your own jewelry, you're in luck! I'm back to a monthly teaching schedule at Gifts of Avalon. I work with another local jewelry artist to teach basic metal working techniques. I generally teach jewelry making methods that don't require a torch. You would be surprised what you can do with just a few tools.

My next class is Monday, March 29 from 6 to 8 PM. The class is "How to Make Stamped and Embellished earrings." Attendees will learn how to make earrings (like those shown here) with a few simple tools. No experience is necessary and everyone will have a new pair of earrings in two hours or less! If you're interested in taking the class, please contact Gifts of Avalon. The classes are filled on a first come, first served basis.

If you would like to notified of future classes by email, please sign up for the KMS Designs email list and check the option to join the "class and teaching schedules" list.

Photo credit: Sterling silver french wire stamped earrings with moss agate briollettes

Monday, February 22, 2010

Don't hate it.....just yet anyway

Share |
A lot of time, effort and planning go into a piece and/or a line of jewelry. I say that because I think it's hard to people to realize that, as much as I would like to, I can't go "Poof" and produce jewelry. Sometimes I have to plan, design and experiment for years to get the jewelry to a point where I like it AND like to make it. (Case in point, the resin jewelry was a three year process of experiments and prototypes.)

I tell you this here because sometimes ideas pop into my head and I have to work on them right away. I had an idea of combine acrylic and handmade papers. I had the idea in mind that it would be similar to a line of sterling silver jewelry I did a few years back, but this time it would be with paper. (The point of all this is coming, I promise.) Anyway, I made the prototype and I didn't like it (brown one on the far left). I decided I didn't like the width, so I improved on the next version (pair in the middle). This time, I didn't like the second pair either, but I couldn't decide what I didn't like. Was it the paper, the texture, the size?? I set them aside, thinking they would end up in the prototype file. I really didn't want to hate them, but I certainly didn't like them. (The pair on the end is the finished "likable" pair.)

I sometimes charge my sub conscious mind with the duty of "fixing a few things" while I'm sleeping, and this design was one of them. I was lucky enough to wake up the next morning with the design improvement I was looking for! I just needed to round the edges a bit. It still gives the same shape, but just "softens" them up a bit. I felt better and love the look. (These are the same two earrings from above, just a closer shot.) At least for me, the earrings don't have that rigid, "geometric" feeling.

This makes me wonder. What else have a thrown in the scrap pile that deserves another look?

The earrings shown here are acrylic with handmade paper adhered to the back. They have sterling silver french ear wires and have a protective coating to make them water resistant. The retail price is $10. Wholesale inquiries are welcome.

Friday, February 19, 2010

It's craft time!

Share |

I'm always looking for stuff to do with my kids. If it comes close to cheap (or free!) entertainment, all the better. I found a site that I love and wanted to share it with readers. All Free Crafts has a huge range of projects from seasonal items, to homemade gifts, to projects for different age groups. Many of them can be done with simple household materials. Enjoy the fun!

Sunday, February 14, 2010

Custom order: part 2

Share |
So onto the next pour of the custom order! The picture shows after I poured the orange. I let the resin cure for 36 hours in between pours. That assures me the pour before is solid so that way if I accidentally get resin where it shouldn't be, I can soak it up with a Q-tip, although sometimes accidents happen. See the pendant in the top row just to the right of center? It spilled after I let it cure so I will have some sanding to do later.


After all the resin has hardended, I can begin sanding. If you look closely at the pieces, you can see I have "overpoured". This is intentional, as I need to sand until the pieces are flush.


The center pieces of silver are also a little taller than the outer piece to make sure that any spills go to the outside, versus the inside (easier cleanup). The next step in the process is to completely sand it down with 8 different grits of sandpaper. I then use a buff to give it a soft, satin finish. The last step that I do is to coat it with a museum quality microcrystalline wax. That makes the pieces just a smidge on the satin side and makes them moderately tarnish resistant.


As I was writing this blog post, I realized that I didn't get a picture of the set before my customer picked it up. Whoops! The pendant at left is the same as the one from the first picture in this post (bottom row, middle pendant) and the center pendant in the second picture in this post. This pendant is available for $50 on a 16 inch rubber neoprene cord. Sterling silver chains are an option for an additional charge.


I hope my customer will send me a picture of his sweetie wearing the set. I will be sure to post. :)

Saturday, February 13, 2010

Support your local businesses: the 3/50 rule

Share |
I saw an interesting article in a newsletter the other day. It was encouraging people to follow the "3/50 rule". This rule is vow to spend at least $50 at 3 local businesses monthly in order to help your local economy. It's an interesting concept. I like the idea, but wanted to take it one step further and put it back on the businesses. You shouldn't expect people to support you. You should have to work hard and earn their trust and respect. Only then, will you have their business. I'll give you an example:

One of my favorite local businesses is Thornebrook Chocolates, in Thornebrook Village, which is in the 2000 block of NW 43rd Street in Gainesville. They are my go to place for chocolate for any special occasion. I'm in there at Christmas, Easter, and yes, Valentine's Day. They have a great selection of chocolates and items to fit any budget or need. So should I support them because they are a local business? I suppose, but I like to support them because they always have a great selection darned good chocolate! They have many items for me to choose from whether it be a personal gift to a loved one (see pink candy box above), a polite way of saying thank you to a colleague, or a last minute gift for a hostess. Could I find these on the internet, maybe, possibly, but these people are also pretty nice. I can call ahead if I'm running late and my order is ready. They realize at times they are super busy and they do everything they can to keep items in stock and get people checked out in a timely fashion. Thornebrook Chocolates knows confections and customer service.

Great customer service is something I also feel strongly about. It doesn't matter how great a piece of jewelry is if you don't like the process of buying it or dealing with the artist. While I would like to know that people support me because I'm local to them, I hope they support my business because I exceed their expectations.

Tuesday, February 09, 2010

Valentine's Day jewelry

Share |
I was in the grocery store on what was pretty much an ordinary day. I walked by the candy display and it came to me: those candy hearts would make great jewelry!

I went through the bag and picked out the best ones (unbroken, readable) and such. My kids only licked half of them (not kidding) so I had to get another bag.


After picking the best ones, I got my game plan together. I had to use a different resin this time for two reasons. One, the resin I was using last fall has to be done in a well ventilated, warm area. My studio isn't climate controlled and I couldn't bring it in my house. Secondly, I wanted something that was a bit more "stable" that would work with a food product. (Resin sometimes reacts with the pieces put in it and causes bubbles. You end up with something that looks like a glass of Alka Seltzer.)


So, after a couple of pours, voila! A cute little pendant with a candy conversation heart. The bail is sterling silver and is large enough for most small and medium sized chains to get through. I've got about 20 or so posted on the KMS Designs Facebook page for all to see. Anyone in the Gainesville, Florida area can purchase these at the Artisans Guild Gallery or Gifts of Avalon. Both of these businesses will be participating in the Uptown Art Hop this coming Friday night. If you see one you like, drop me an email or call me to place an order as it may be a few days before I can get them on the KMS Designs site.

Who knows what's next???
Related Posts with Thumbnails