Monday, July 19, 2010

Cupcake resin jewelry pendants

Share |

I'm excited to show you some new scrabble tile resin pendants I have finished.  These cupcake pendants are available at Yum Cupcakery, Gainesville, Florida. 


Claire and Stephanie Browning of Yum Cupcakery were wonderful in allowing me to only describe my idea to them and saying yes to the new line of jewelry.


I dropped the pendants off a couple of days ago and got these pictures before I left.


The digitally enhanced cupcake images are adhered to the back of a scrabble tile and finished with a dome of resin on top.


There are many styles and colors of cupcakes.  The silver tone bail allows many sizes of chain, cord or ribbon to pass through.  The pendants come on a 24 inch silver tone ball chain.


I had a great time making them.  The process fits well with making the other resin bracelets that I've been blogging about as well.


Claire and Stephanie said a lot of their patrons are "die-hard" cupcake enthusiasts.  I hope they like to wear them as well.  *smile*


We talked in the future about expanding the cupcake resin jewelry line based upon customer feedback.


I love how I was able to photograph this cupcake with its "inspiration".


They are very light to wear.  They are water resistant, but not water proof. 

These pendants retail for $12.  


While I don't have individual pictures right now, if you have a particular interest in one you see here, or want to inquire about color patterns, please email me.  Otherwise, be checking the KMS Designs website for pictures in the next couple of weeks.

Friday, July 16, 2010

Making resin jewelry bracelets, Part 4

Share |
(Read part 1, part 2, and part 3 of the resin jewelry making process)


So the clear resin has cured for about 1 to 2 days.  I can add the color behind it.


To go with this set of papers, I am doing this batch in a medium pink.  I mix the resin just as I did before and pour it on top of the clear resin with the papers that have already cured.  I also pass my heat gun over the top to remove any bubbles that may have occurred.  In the past, I have had about 60 minutes to be able to work with this resin in its liquid form (also known as pot time).  For some reason, I have only had about 15 to 20 minutes here recently to be able to work with it.  I'm sure it's temperature and humidity related.  The resin is still curing properly, so I haven't been too concerned.


Once the pink layer of resin has completely cured, I can pop the pieces out of their mold.  If you look carefully at the edges, you will see there is excess resin that needs to be sanded.


If the resin is thin enough, I can trim the excess with heavy duty scissors before I sand and finish them.


This picture shows that there are two layers of resin to each bracelet link:  a clear top layer and a colored bottom layer. 


While tiny bubbles are to be expected in resin jewelry, the piece at left shows what happens if I don't get out the bubbles trapped underneath the papers in the clear layer.  This piece is headed for the scrap pile.  Darn!


The next step is to show some of the sanding and how I drill the pieces.

Wednesday, July 14, 2010

Forged metal bracelet jewelry making class

Share |
I had the pleasure of teaching another jewelry making class at Gifts of Avalon this past Monday night.  I had two class regulars and two complete newbies to my class.  This class was forging metal with a hammer and block to create a cuff bracelet.


This is Judy, who is one of my class regulars.  She is usually with her "partner in crime" Claudia, who actually had taken the class when I taught it in May.


This is Elaine, who had come from Ocala with her friend Debbie to take the class.


Judy shows that as a part of hammering the bracelet to a half circle, it also makes a nice smile.


This is Elaine as she's finishing up her bracelet.  You can't tell from the picture, but she was absolutely determined to make that bracelet perfect.  A girl after my own heart!


This is Debbie's finished bracelet.  My photography skills don't allow you to truly appreciate the pinks, blues and golds she was able to get with a torch on this copper bracelet.  The colors really are beautiful.


Judy loved making her bracelet. She left a polished look to her copper bracelet and wore it home that night.  (I think she was happy not to have needed to use the jeweler's saw, but that's another story...)

Lastly is Jill, who has also taken several of my other classes.  She was the class "curve buster" and decided to make two bracelets in the class.  The one further down on her wrist is made of copper, while the other one is made of sterling silver.  She got a chance to use the propane torch and liver of sulfur to expand her metal coloring knowledge.


If you're interested in taking this class, drop me an email.  I schedule classes once a month based on what people are most interested in taking.


Monday, July 12, 2010

Making resin jewelry bracelets, Part 3

Share |
(In case you missed other posts you can read part 1 and part 2)

I wear nitrile gloves whenever I'm working with resin.  The resin can be irritating to the skin and it's downright sticky.  I always use nitrile gloves (versus latex) because some types of resin will react with latex.  I use small plastic mixing cups (seen on the far left) with graduations on the side.  It allows me to visually measure exact amounts of resin.  (These happen to be cups with dram marks on the side.)


These are the finished, sealed papers.  They have been cut and sealed twice.


To make these resin bracelet links, I will be using a clear, plastic mold.  This will allow me to lift up the mold and see if there are any bubbles trapped underneath the papers once I place them.

Since I pour resin at odd hours of the day and night, (and this time was no exception), I don't have anyone available to take pictures of the pouring process.  To give you a mental image here, I mix the two cups of carefully measured resin together and pour into the mold.


I only pour the mold about halfway full.  I then carefully slide the sealed paper into the mold with the back side facing me.  I lift each mold to see if there are bubbles trapped underneath the papers.  If there are, I use a toothpick to tap the papers and the heat from my heat gun (the blue thing in the picture) to draw the bubbles out.

Once everything is poured, I cover the resin molds and let them sit to cure.  The initial cure takes about 24 hours.

The next step:  adding color to the back.

Friday, July 09, 2010

A new style resin jewelry pendant

Share |
If you're reading this hoping for the next step in the resin bracelet making process, it is still forthcoming.  I have a slight detour in the jewelry making series.

I blogged a few days ago about my visit to Yum Cupcakery in Gainesville, Florida.  The owners and I discussed if I could do a line of jewelry for them that would fit with their bakery.  I had an idea in mind and decided to go with it. 


This is a resin jewelry pendant with a cupcake image on the front of a scrabble tile.  The cupcake image was digitally created and printed onto high quality laser paper. 


The image is sealed with decoupage glue (just like the bracelets) then adhered to a scrabble tile.  Resin is placed on top and allowed to cure.


The pendant is finished with a silver tone bail that will allow most any chain, cord or ribbon to pass through the bail opening.  The pendant comes on a 24 inch, silver tone ball chain.  The chain can be cut to fit as desired.


This is just the first in the series of several cupcake styles.  I will post pictures of new pendants along with the resin bracelets also in process next week on this blog.

Wednesday, July 07, 2010

A grilled chicken recipe

Share |
I don't know about you, but I love to grill food.  It always seems to taste better and during the summer especially, it keeps me from heating up my kitchen. 

This is one of my favorite grilled chicken recipes because not only does it taste good, but it is pretty quick and easy to prepare.

Enjoy!

Grilled Chicken with Greek Salsa

4 to 6 chicken breasts
1 cup sliced Kalamata Olives
1 roma tomato, chopped
1 tsp. red wine vinegar
1/4 cup plus 1 tbsp olive oil
2 cloves of garlic
Salt and pepper to taste
Fresh parsley and/or oregano
1/4 to 1/3 cup of feta cheese (optional)

Marinate the chicken breasts in 1/4 cup olive oil and 1 crushed garlic clove for at least 30 minutes (but most of the day will also do fine).  Preheat the grill.  While it is heating, make the salsa by combining the olives, tomato, vinegar, 1 tbsp olive oil, 1 clove of crushed garlic, and fresh herbs (to taste).  Let the salsa warm to room temperature while the chicken is grilling.  Salt and pepper the chicken before placing on the grill.  Cook thoroughly.  Serve with the salsa on the side and feta cheese sprinkled on top. 

Monday, July 05, 2010

A visit to a local bakery

Share |
So who doesn't love a good cupcake?  I read an article in the Gainesville Sun and the Florida Alligator featuring a new cupcake bakery, Yum Cupcakery,  that had opened in town.  It was started by recent University of Florida graduates Claire and Stephanie Browning.  I sent them a note of congratulations and they invited me by for a visit.


I was immediately struck by all the cupcake choices they had!  Pick your cake, then a filling and a frosting,  Finish it off with your favorite topping.


They were, of course, filling orders while I was there.  (That's Stephanie behind the counter.)  I couldn't possibly leave without a few cupcakes.  (Especially since my little peeps were mad they weren't going with me.)


This one's for me.  :) Carrot cake with a cream cheese icing.  It was just as good as it looks.


This is is strawberry cake with a chocolate filling and icing.  Stephanie is drizzling a fruit glaze on top.


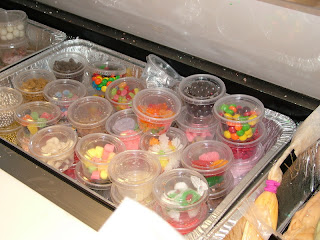
There are two large trays of topping possibilities.

My order is partially finished.  The one in the front with the sprinkles is just a simple vanilla cake and vanilla icing.


Here are Stephanie (left) and Claire (right) with my finished order.  The family just loved them!

While I was there, Claire and Stephanie asked if I could come up with some "cupcake jewelry" for their store.  Wow!  I am thrilled to be asked!  As it so has it, there are a few things on the design table that I think will be a good fit. 


Saturday, July 03, 2010

Making resin jewelry bracelets, Part 2

Share |
Part 2 of the resin bracelet making process

So now that I've placed the first coat of the sealant on the paper, it's time for me to cut.  For these resin bracelets, I need 5/8 inch squares.  I cut a 5/8 inch paper strip using a ruler and an exacto knife.


I then cut the strip into 5/8 inch squares using a T-square and an exacto knife.  (Don't forget to use newspaper or some other padding under your blade or you will make marks into the surface you're cutting on.)


You can see now that I have a bunch of squares in the paper pattern I've previously sealed.


I don't like the "sharp" corners on the squares, so I round the edges off with scissors.

You can see the finished squares here.  The top ones will be used.  The bottom ones are shown before the edges get rounded off.


The next step is to reseal them again with the decoupage glue.

Check back next week for the next step!

In case you missed it, Part 1 of the resin jewelry bracelet making process

Wednesday, June 30, 2010

Making resin jewelry bracelets, Part 1

Share |
In my post from last week about which resin bracelet people preferred, the colorful, stretchy style won by a mile!  As I embark on making more of these, I want to include pictures on the process and just how it gets from a sketch pad to a finished piece of resin jewelry.

Part 1 of the resin bracelet making process

Before I ever start making the resin bracelets, I collect different kinds of paper to go in the bracelets.  These papers could be vintage papers, wall papers, computer generated art, and such.  I keep them all together and every so often go through them to group together ones that would be complementary in their presentation.  For these, I liked the flowers and the pinks and chose to pair these three together as a bracelet.


Before I can use the papers in the resin, I have to seal them.  I use a decoupage glue (general catch all term for many different kinds of sticky, sealing glue) to cover both sides of the paper.  What happens if I don't seal the papers?  See my blog post with one of my resin bracelet prototypes.

I use a wide paint brush (no particular quality) and apply a thin layer of the glue to both sides of the paper.  It's just enough to cover the paper, almost the same idea as basting a piece of meat on the grill.  I now have to let the paper dry a couple of hours before I can cut out the squares.

To be continued....

Monday, June 28, 2010

Some down time from jewelry making

Share |
I had family in town for a few days to visit.  They were also wine drinkers and I always love trying out new wine.  My favorite new wine that I tried was Nobilo Sauvignon Blanc, a white from New Zealand.  It had some quite fragrant pear notes to it and it paired well with the goat cheese we also enjoyed as an appetizer.  I almost always prefer red wine, but in this hot weather, a nice chilled white wine seems to hit the spot.  I'm looking forward to picking this one up the next time I'm through my favorite wine shop.

Thursday, June 24, 2010

My new jewelry making class - Forged metal pin

Share |
 
 I have a new jewelry making class that I will be teaching at Gifts of Avalon on August 2.  It is learning how to make a wire brooch.  (Class examples are shown here.)


This brooch is completely made without soldering!  I made this brooch with brass wire, but class attendees can make it with copper, sterling silver or gold fill wire if desired.  NO experience is necessary.


The class will be officially announced in Gift's of Avalon's newsletter going out next week, but you can register for it now by calling them.

I am also teaching the forged bracelet class on July 12 for anyone interested in signing up for that class as well.
Related Posts with Thumbnails